?
前言
自 .NET 6 起,runtime 中默認的線程池實現(xiàn)從 C++ 代碼改為了 C#,更方便我們學習線程池的設計了。
https://github.com/dotnet/runtime/tree/release/6.0/src/libraries/System.Threading.ThreadPool
新的線程池實現(xiàn)位于 PortableThreadPool 中,原 ThreadPool 中的對外公開的接口會直接調用 PortableThreadPool 中的實現(xiàn)。
通過設置環(huán)境變量 ThreadPool_UsePortableThreadPool 為 0 可以設置成使用老的線程池實現(xiàn)。
https://github.com/dotnet/runtime/pull/43841/commits/b0d47b84a6845a70f011d1b0d3ce5adde9a4d7b7
本文以 .NET 6 runtime 源碼作為學習材料,對線程池的設計進行介紹。從目前的理解上來看,其整體的設計與原來 C++ 的實現(xiàn)并沒有特別大的出入。
注意:
- 本文不涉及細節(jié)的代碼實現(xiàn),主要為大家介紹其整體設計。所展示的代碼并非原封不動的源碼,而是為了方便理解的簡化版。
ThreadPool.SetMaxThreads(int workerThreads, int completionPortThreads) 中的 completionPortThreads 所相關的 IOCP線程池 是 .NET Framework 時代的遺留產(chǎn)物,用于管理 Windows 平臺專有的 IOCP 的回調線程池。目前沒看到有什么地方在用它了,completionPortThreads 這個參數(shù)也已經(jīng)沒有意義,底層IO庫是自己維護的IO等待線程池。本文只涉及 worker thread 池的介紹。- 本文理解并不完整也不一定完全正確,有異議的地方歡迎留言討論。
- 為了解釋問題,一部分代碼會運行在 .NET 6 之前的環(huán)境中。
任務的調度
線程池的待執(zhí)行任務被存放在一個隊列系統(tǒng)中。這個系統(tǒng)包括一個 全局隊列,以及綁定在每一個 Worker Thread 上 的 本地隊列 。而線程池中的每一個線程都在執(zhí)行 while(true) 的循環(huán),從這個隊列系統(tǒng)中領取并執(zhí)行任務。
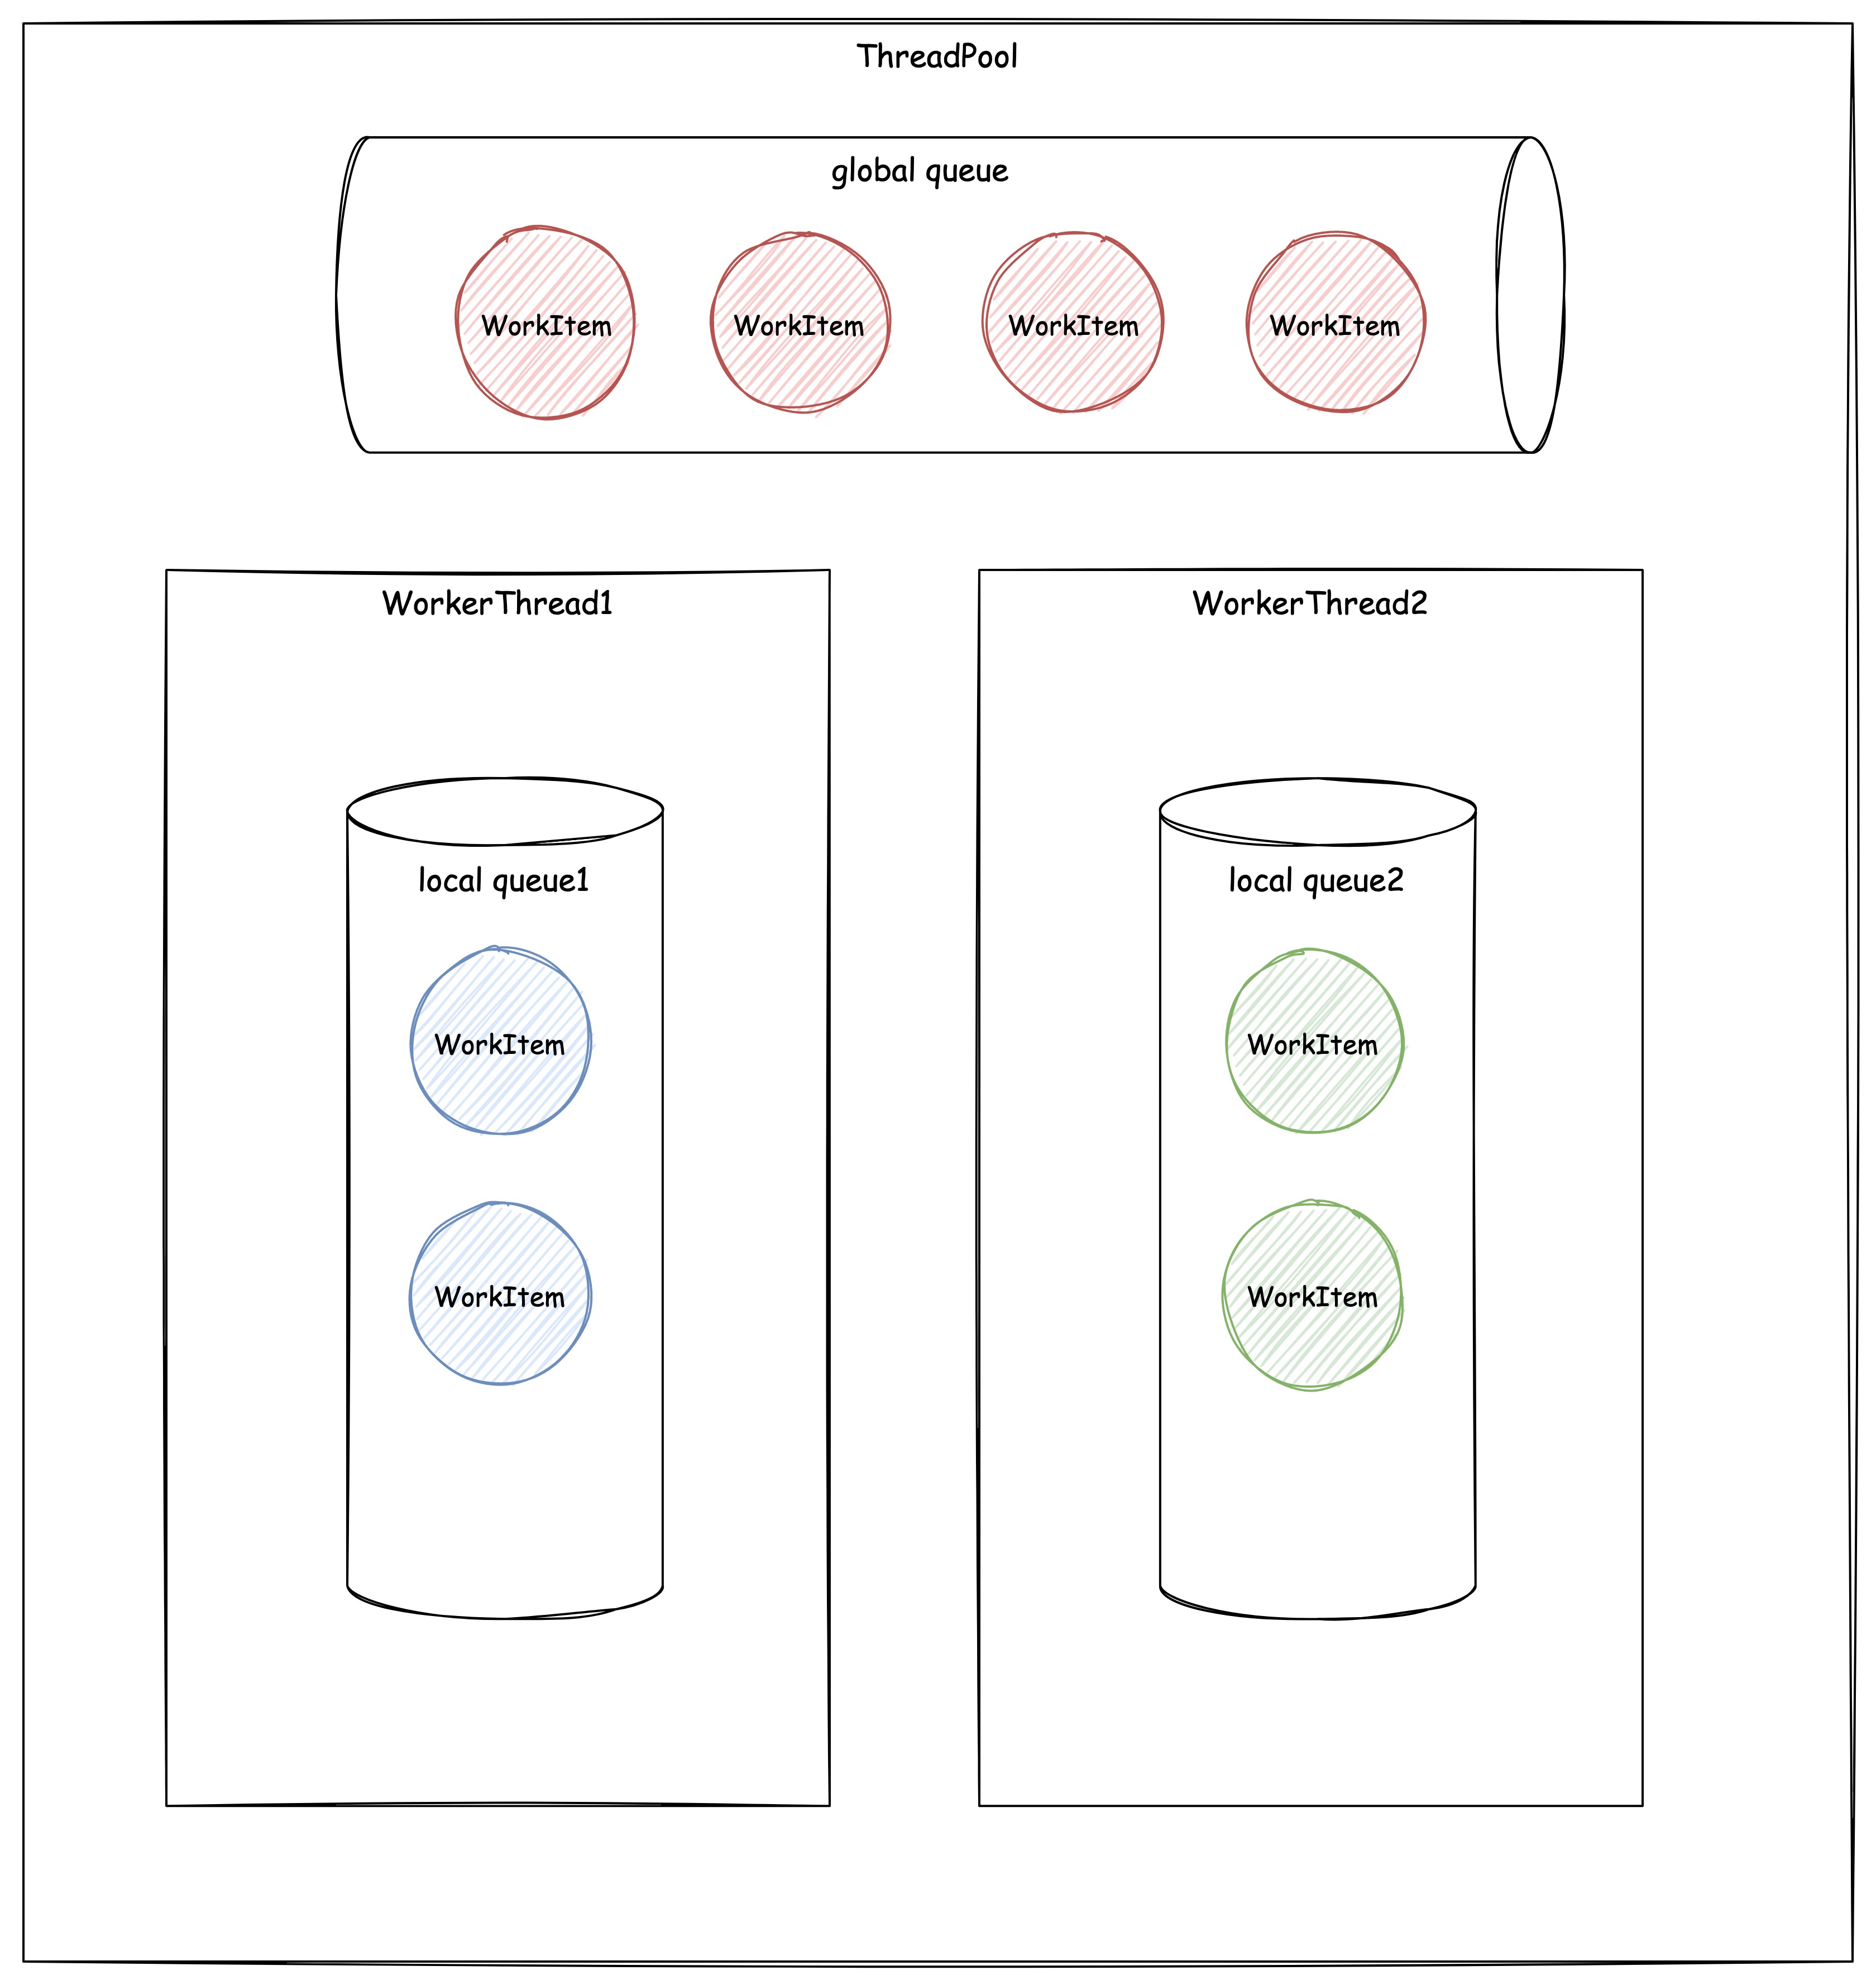

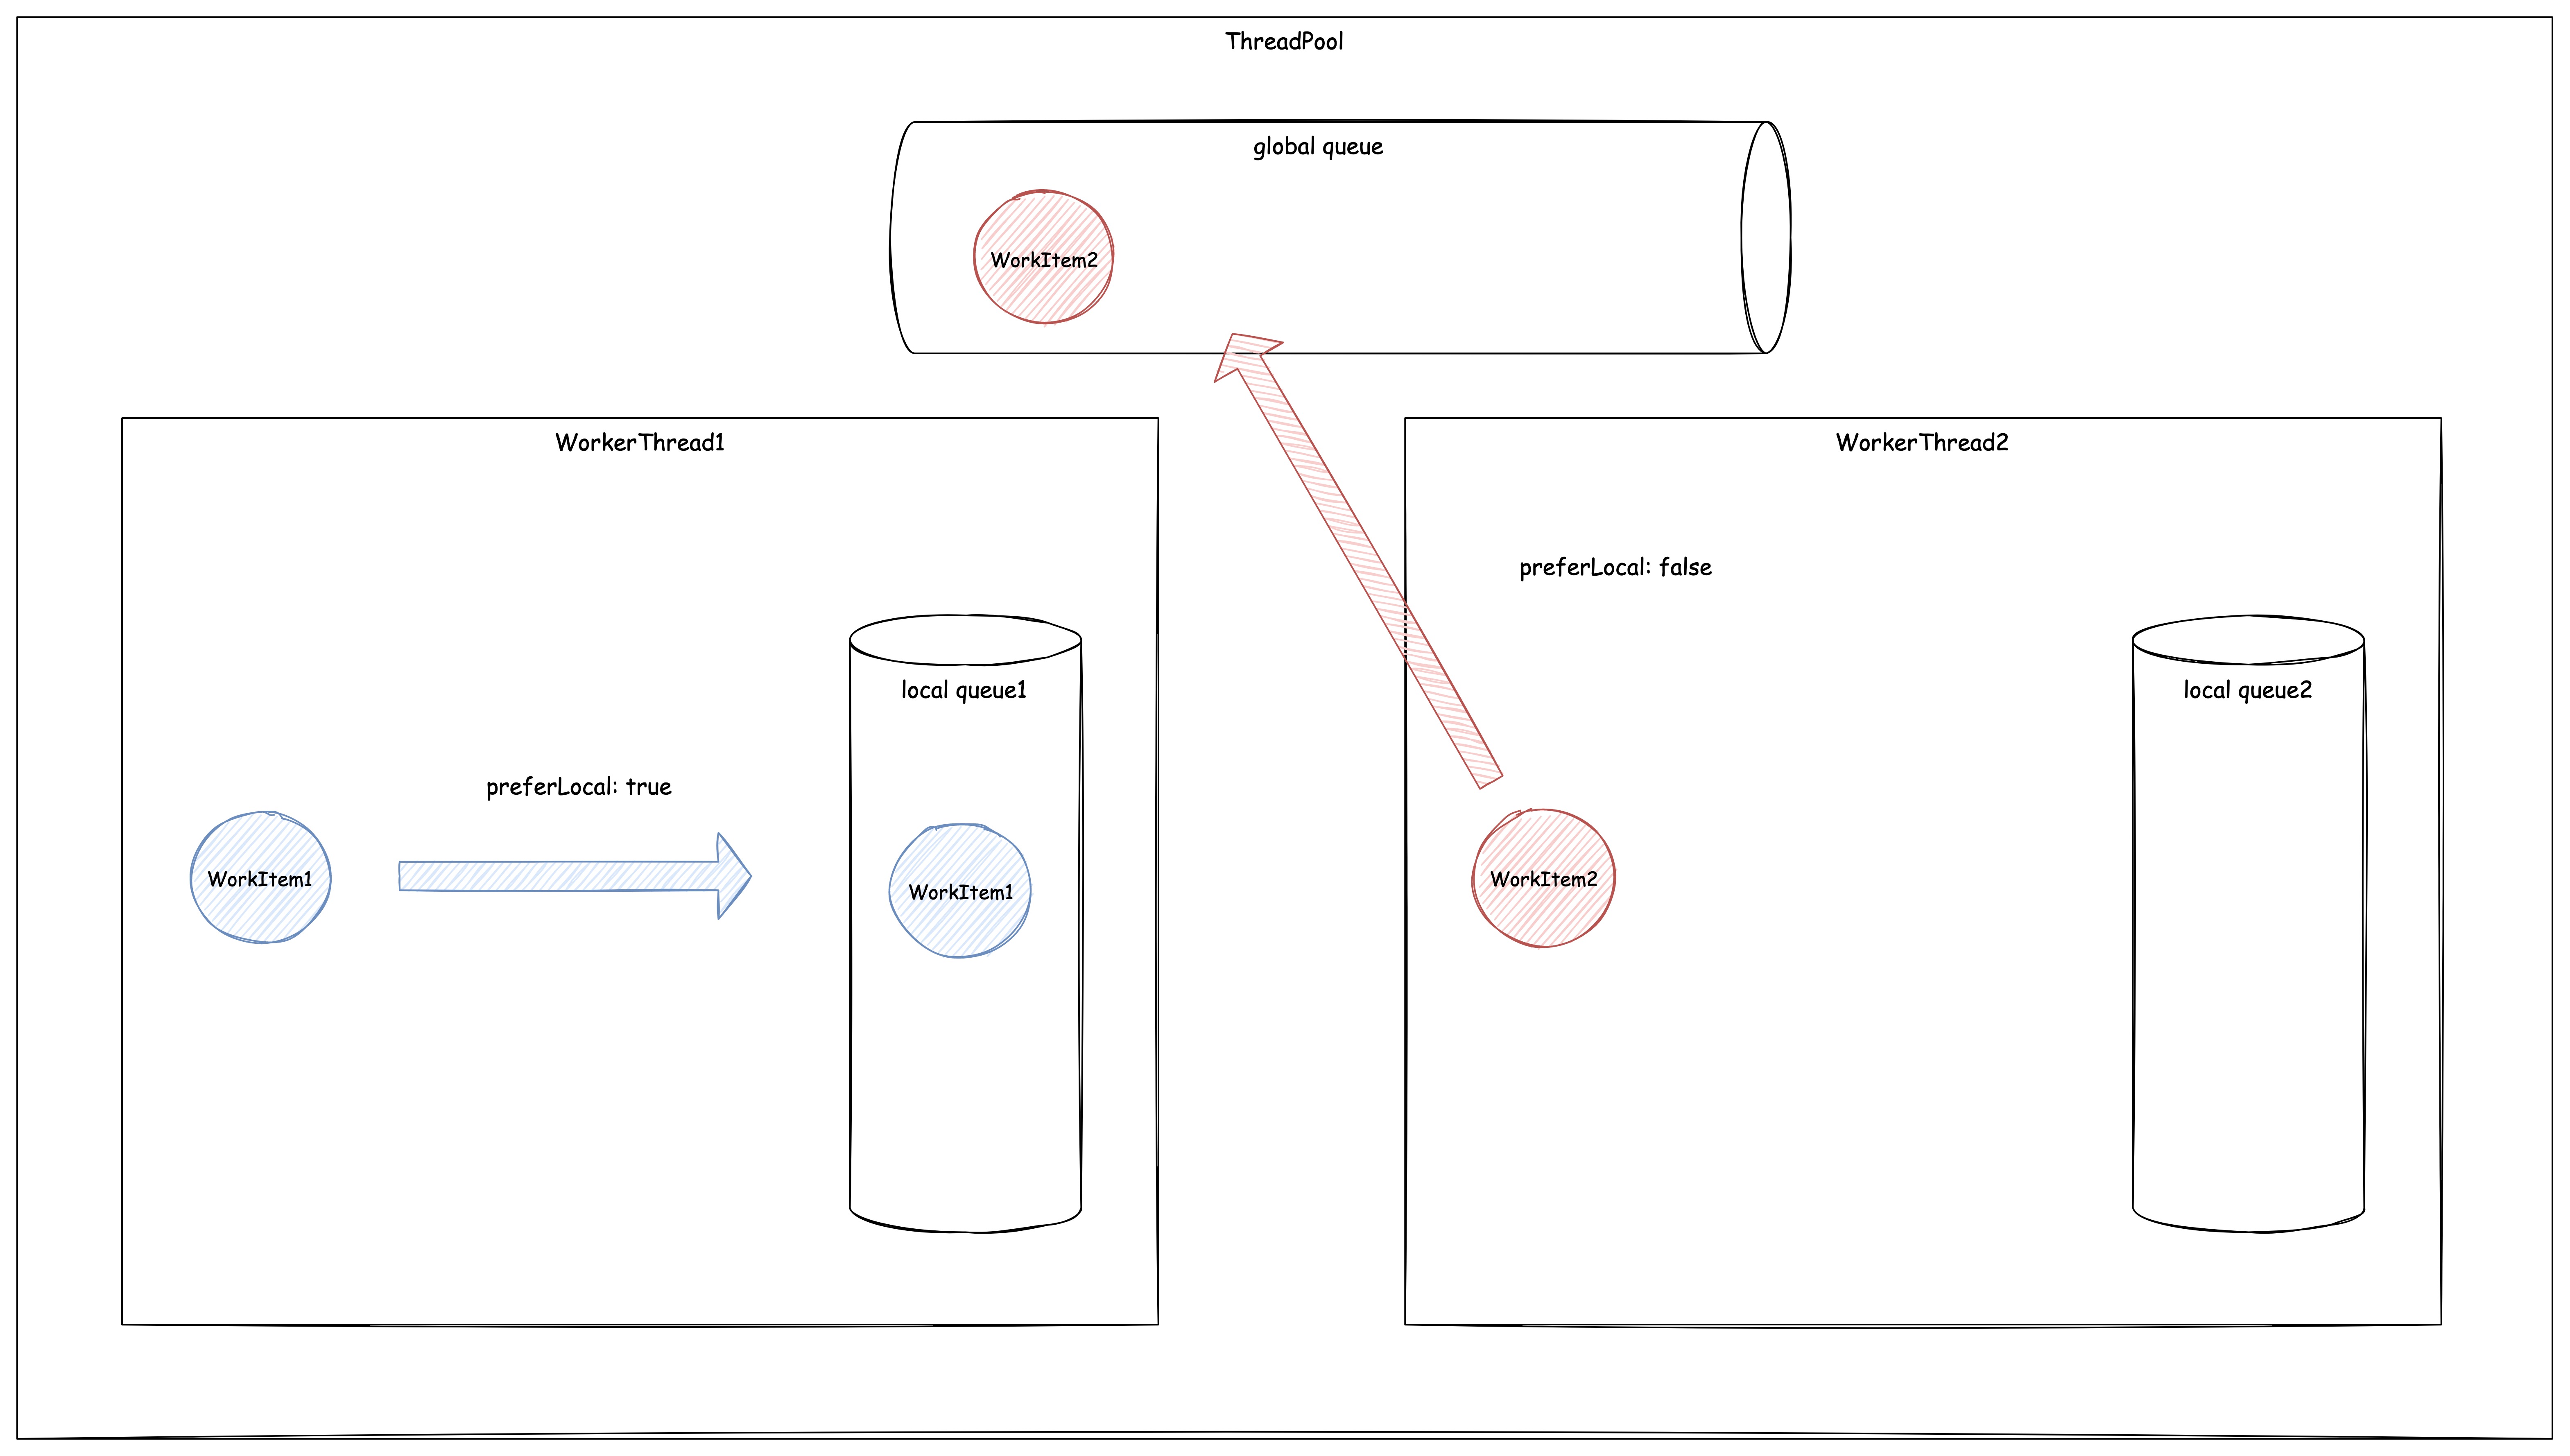
在 ThreadPool.QueueUserWorkItem 的重載方法 ThreadPool.QueueUserWorkItem<TState>(Action<TState> callBack, TState state, bool preferLocal) 里有一個 preferLocal 參數(shù)。
調用不帶 preferLocal 參數(shù)的 ThreadPool.QueueUserWorkItem 方法重載,任務會被放到全局隊列。
當 preferLocal 為 true 的時候,如果調用 ThreadPool.QueueUserWorkItem 代碼的線程正好是個線程池里的某個線程,則該任務就會進入該線程的本地隊列中。除此之外的情況則會被放到全局隊列中等待未來被某個 Worker Thread 撿走。
在線程池外的線程中調用,不管 preferLocal 傳的是什么,任務都會被放到全局隊列。
基本調度單元
本地隊列和全局隊列的元素類型被定義為 object,實際的任務類型分為兩類,在從隊列系統(tǒng)取到任務之后會判斷類型并執(zhí)行對應的方法。
IThreadPoolWorkItem 實現(xiàn)類的實例。
/// <summary>Represents a work item that can be executed by the ThreadPool.</summary>
public interface IThreadPoolWorkItem
{
    void Execute();
}
執(zhí)行 Execute 方法也就代表著任務的執(zhí)行。
IThreadPoolWorkItem 的具體實現(xiàn)有很多,例如通過 ThreadPool.QueueUserWorkItem(WaitCallback callBack) 傳入的 callBack 委托實例會被包裝到一個 QueueUserWorkItemCallback 實例里。QueueUserWorkItemCallback 是 IThreadPoolWorkItem 的實現(xiàn)類。
Task
class Task
{
    internal void InnerInvoke();
}
執(zhí)行 InnerInvoke 會執(zhí)行 Task 所包含的委托。
全局隊列
全局隊列 是由 ThreadPoolWorkQueue 維護的,同時它也是整個隊列系統(tǒng)的入口,直接被 ThreadPool 所引用。
public static class ThreadPool
{
    internal static readonly ThreadPoolWorkQueue s_workQueue = new ThreadPoolWorkQueue();
    public static bool QueueUserWorkItem(WaitCallback callBack, object state)
    {
        object tpcallBack = new QueueUserWorkItemCallback(callBack!, state);
        s_workQueue.Enqueue(tpcallBack, forceGlobal: true);
        return true;
    }
}
internal sealed class ThreadPoolWorkQueue
{
    // 全局隊列
    internal readonly ConcurrentQueue<object> workItems = new ConcurrentQueue<object>();
    // forceGlobal 為 true 時,push 到全局隊列,否則就放到本地隊列
    public void Enqueue(object callback, bool forceGlobal);
}
本地隊列
線程池中的每一個線程都會綁定一個 ThreadPoolWorkQueueThreadLocals 實例,在 workStealingQueue 這個字段上保存著本地隊列。
internal sealed class ThreadPoolWorkQueueThreadLocals
{
    // 綁定在線程池線程上
    [ThreadStatic]
    public static ThreadPoolWorkQueueThreadLocals threadLocals;
    // 持有全局隊列的引用,以便能在需要的時候將任務轉移到全局隊列上
    public readonly ThreadPoolWorkQueue workQueue;
    // 本地隊列的直接維護者
    public readonly ThreadPoolWorkQueue.WorkStealingQueue workStealingQueue;
    public readonly Thread currentThread;
    public ThreadPoolWorkQueueThreadLocals(ThreadPoolWorkQueue tpq)
    {
        workQueue = tpq;
        workStealingQueue = new ThreadPoolWorkQueue.WorkStealingQueue();
        // WorkStealingQueueList 會集中管理 workStealingQueue
        ThreadPoolWorkQueue.WorkStealingQueueList.Add(workStealingQueue);
        currentThread = Thread.CurrentThread;
    }
    // 提供將本地隊列中的任務轉移到全局隊列中去的功能,
    // 當 ThreadPool 通過后文將會介紹的 HillClimbing 算法判斷得出當前線程是多余的線程后,
    // 會調用此方法對任務進行轉移
    public void TransferLocalWork()
    {
        while (workStealingQueue.LocalPop() is object cb)
        {
            workQueue.Enqueue(cb, forceGlobal: true);
        }
    }
    ~ThreadPoolWorkQueueThreadLocals()
    {
        if (null != workStealingQueue)
        {
            // TransferLocalWork 真正的目的并非是為了在這里被調用,這邊只是確保任務不會丟的 fallback 邏輯
            TransferLocalWork();
            ThreadPoolWorkQueue.WorkStealingQueueList.Remove(workStealingQueue);
        }
    }
}
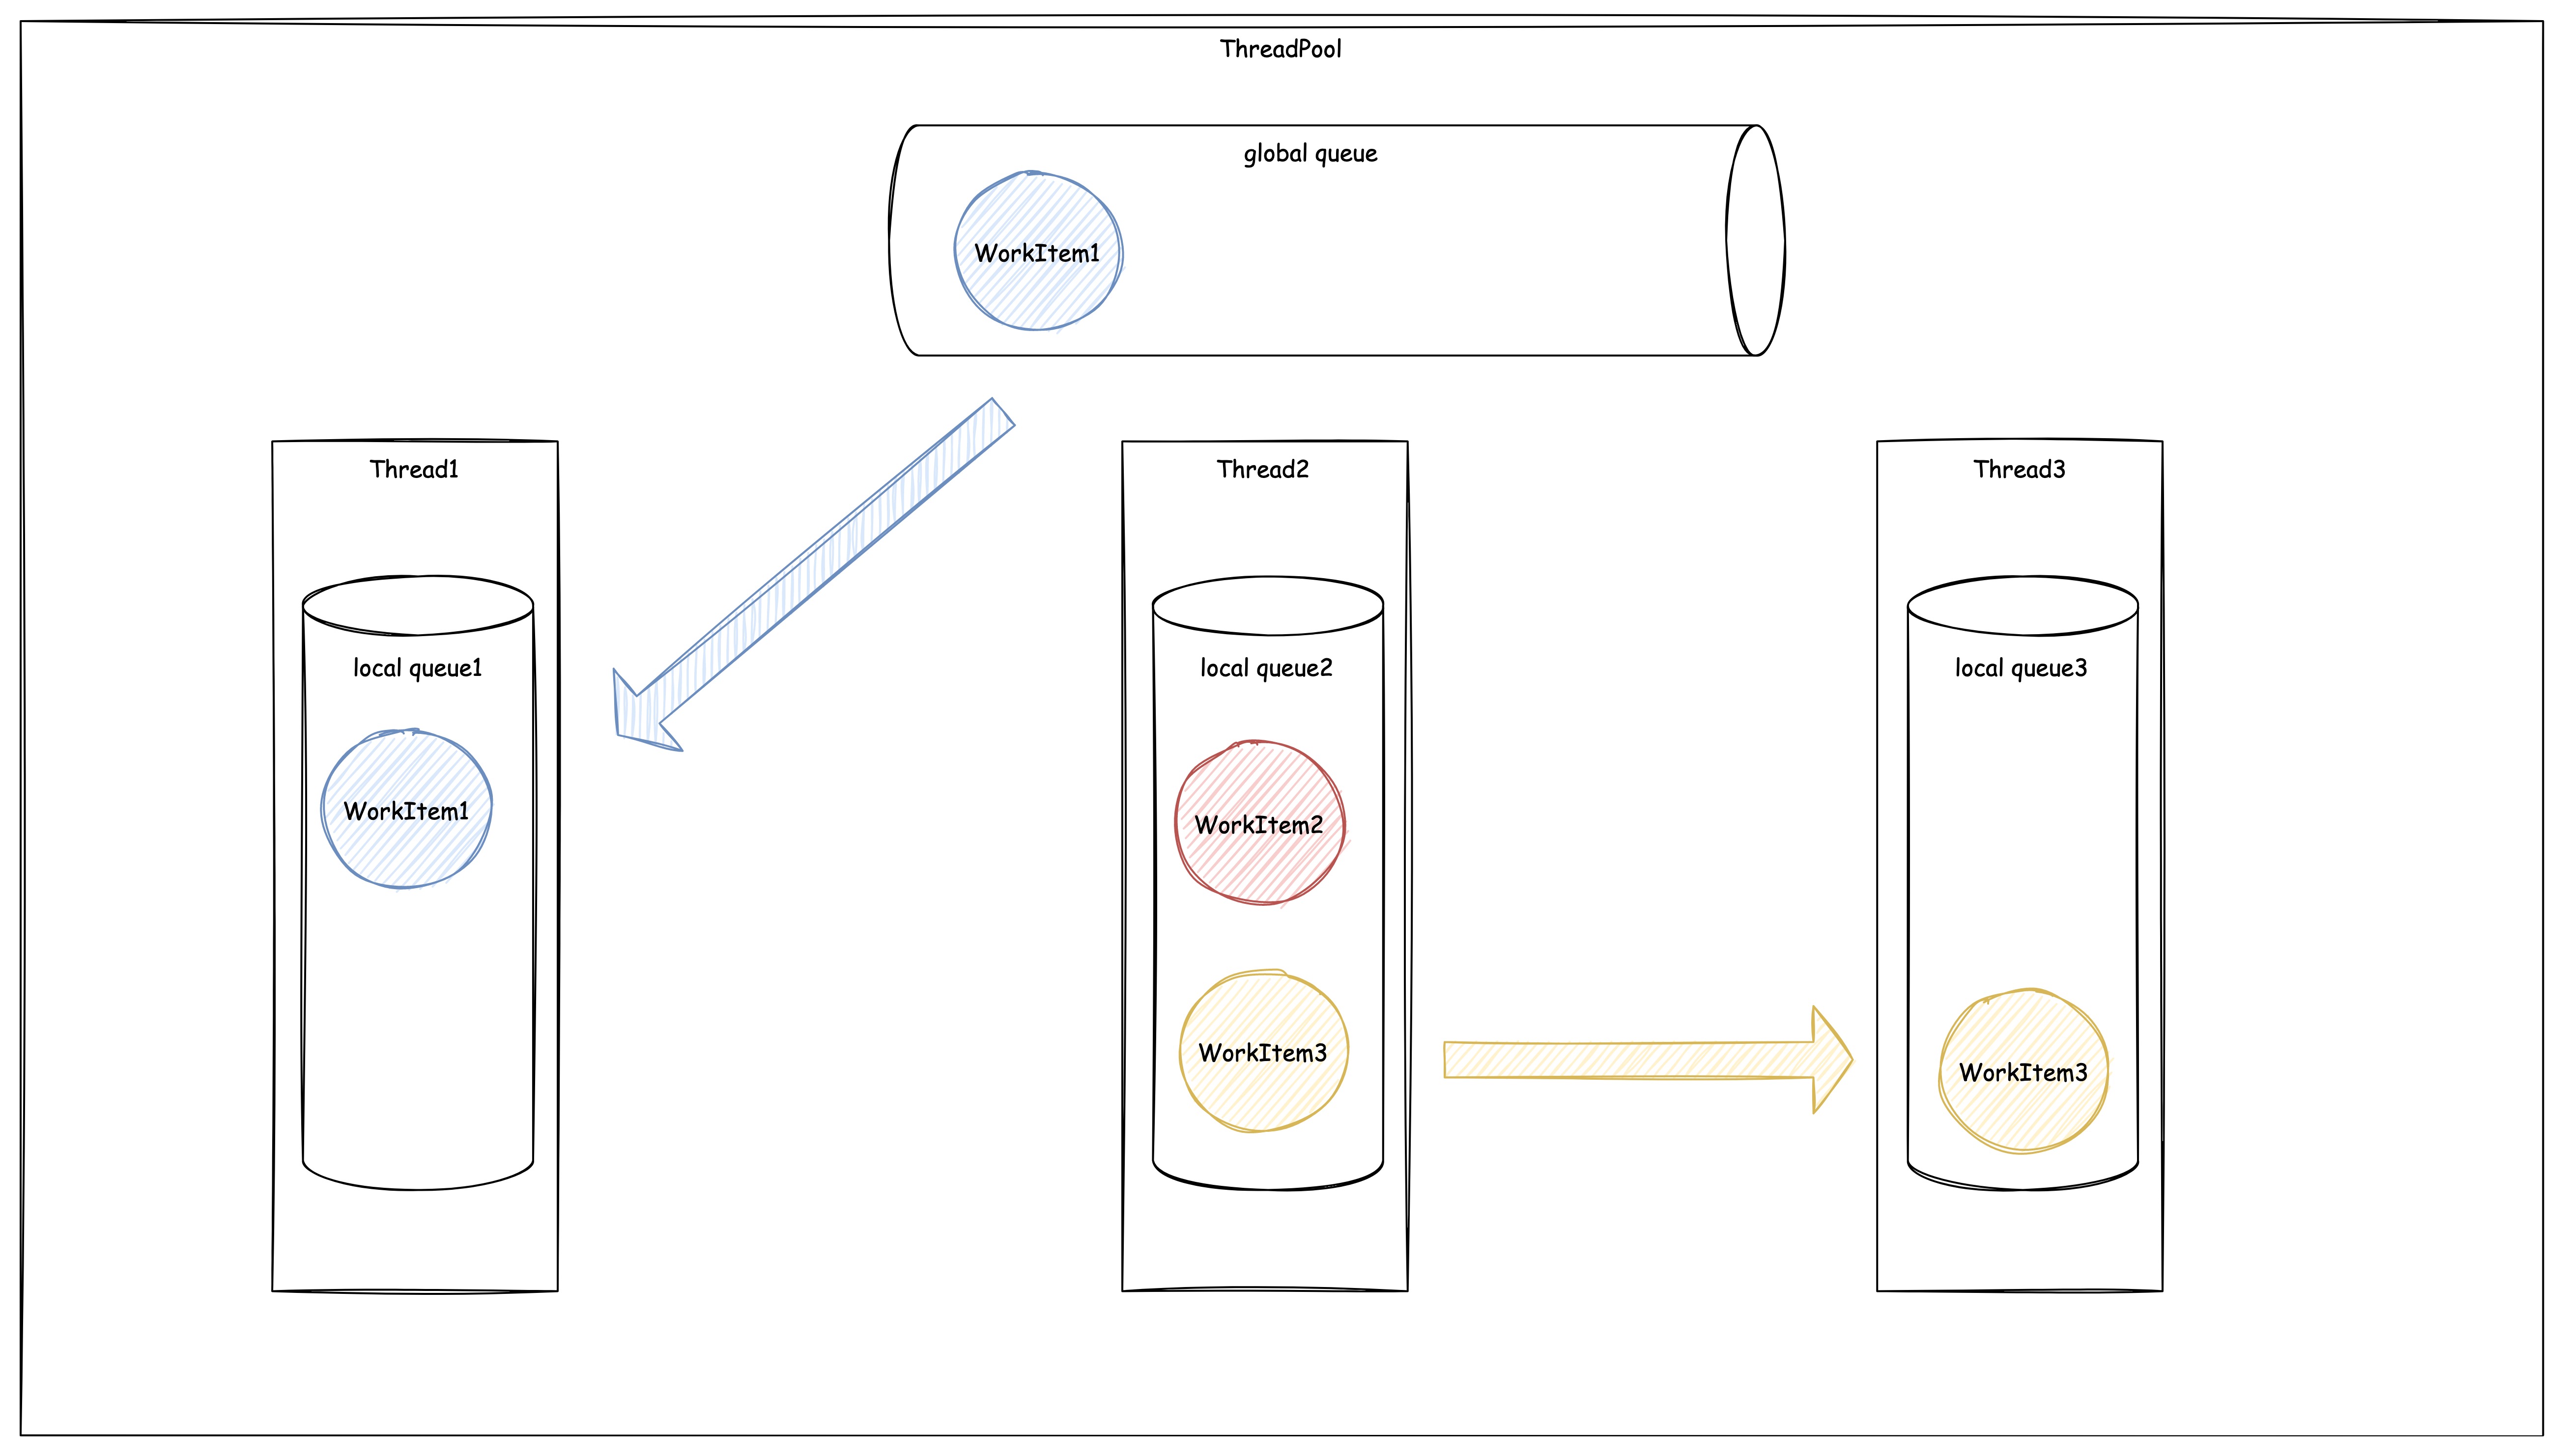
偷竊機制
這里思考一個問題,為什么本地隊列的名字會被叫做 WorkStealingQueue 呢?
所有 Worker Thread 的 WorkStealingQueue 都被集中在 WorkStealingQueueList 中。對線程池中其他所有線程可見。
Worker Thread 的 while(true) 中優(yōu)先會從自身的 WorkStealingQueue 中取任務。如果本地隊列已經(jīng)被清空,就會從全局隊列中取任務。例如下圖的 Thread1 取全局隊列中領取了一個任務。
同時 Thread3 也沒活干了,但是全局隊列中的任務被 Thread1 搶走了。這時候就會去 從 Thread2 的本地隊列中搶 Thread2 的活。
Worker Thread 的生命周期管理
上文介紹了線程池調度任務的機制,交給線程池的任務會被放到全局隊列或者本地隊列中,最終由線程池中的 Worker Thread 去執(zhí)行任務。接下來就和大家介紹一下線程池是如何去管理這些 Worker Thread 的生命周期的。
為了更方便的解釋線程管理的機制,這邊使用下面使用一些代碼做演示。
代碼參考自 https://devblogs.microsoft.com/dotnet/performance-improvements-in-net-6/#threading。
線程注入實驗
Task.Run 會將 Task 調度到線程池中執(zhí)行,下面的示例代碼中等效于 ThreadPool.QueueUserWorkItem(WaitCallback callBack),會把 Task 放到隊列系統(tǒng)的全局隊列中(順便一提,如果在一個線程池線程中執(zhí)行 Task.Run 會將 Task 調度到此線程池線程的本地隊列中)。
.NET 5 實驗一 默認線程池配置
static void Main(string[] args)
{
    var sw = Stopwatch.StartNew();
    var tcs = new TaskCompletionSource();
    var tasks = new List<Task>();
    for (int i = 1; i <= Environment.ProcessorCount * 2; i++)
    {
        int id = i;
        Console.WriteLine($"Loop Id: {id:00}    | {sw.Elapsed.TotalSeconds:0.000} | Busy Threads: {GetBusyThreads()}");
        tasks.Add(Task.Run(() =>
        {
            Console.WriteLine($"Task Id: {id:00}    | {sw.Elapsed.TotalSeconds:0.000} | Busy Threads: {GetBusyThreads()}");
            tcs.Task.Wait();
        }));
    }
    tasks.Add(Task.Run(() =>
    {
        Console.WriteLine($"Task SetResult | {sw.Elapsed.TotalSeconds:0.000} | Busy Threads: {GetBusyThreads()}");
        tcs.SetResult();
    }));
    Task.WaitAll(tasks.ToArray());
    Console.WriteLine($"Done:          | {sw.Elapsed.TotalSeconds:0.000}");
}
static int GetBusyThreads()
{
    ThreadPool.GetAvailableThreads(out var available, out _);
    ThreadPool.GetMaxThreads(out var max, out _);
    return max - available;
}
首先在代碼在 .NET 5 環(huán)境中運行以下代碼,CPU 邏輯核心數(shù) 12。
Loop Id: 01    | 0.000 | Busy Threads: 0
Loop Id: 02    | 0.112 | Busy Threads: 1
Loop Id: 03    | 0.112 | Busy Threads: 2
Loop Id: 04    | 0.113 | Busy Threads: 4
Loop Id: 05    | 0.113 | Busy Threads: 7
Loop Id: 06    | 0.113 | Busy Threads: 10
Loop Id: 07    | 0.113 | Busy Threads: 10
Task Id: 01    | 0.113 | Busy Threads: 11
Task Id: 02    | 0.113 | Busy Threads: 12
Task Id: 03    | 0.113 | Busy Threads: 12
Task Id: 07    | 0.113 | Busy Threads: 12
Task Id: 04    | 0.113 | Busy Threads: 12
Task Id: 05    | 0.113 | Busy Threads: 12
Loop Id: 08    | 0.113 | Busy Threads: 10
Task Id: 08    | 0.113 | Busy Threads: 12
Loop Id: 09    | 0.113 | Busy Threads: 11
Loop Id: 10    | 0.113 | Busy Threads: 12
Loop Id: 11    | 0.114 | Busy Threads: 12
Loop Id: 12    | 0.114 | Busy Threads: 12
Loop Id: 13    | 0.114 | Busy Threads: 12
Loop Id: 14    | 0.114 | Busy Threads: 12
Loop Id: 15    | 0.114 | Busy Threads: 12
Loop Id: 16    | 0.114 | Busy Threads: 12
Loop Id: 17    | 0.114 | Busy Threads: 12
Loop Id: 18    | 0.114 | Busy Threads: 12
Loop Id: 19    | 0.114 | Busy Threads: 12
Loop Id: 20    | 0.114 | Busy Threads: 12
Loop Id: 21    | 0.114 | Busy Threads: 12
Loop Id: 22    | 0.114 | Busy Threads: 12
Loop Id: 23    | 0.114 | Busy Threads: 12
Loop Id: 24    | 0.114 | Busy Threads: 12
Task Id: 09    | 0.114 | Busy Threads: 12
Task Id: 06    | 0.114 | Busy Threads: 12
Task Id: 10    | 0.114 | Busy Threads: 12
Task Id: 11    | 0.114 | Busy Threads: 12
Task Id: 12    | 0.114 | Busy Threads: 12
Task Id: 13    | 1.091 | Busy Threads: 13
Task Id: 14    | 1.594 | Busy Threads: 14
Task Id: 15    | 2.099 | Busy Threads: 15
Task Id: 16    | 3.102 | Busy Threads: 16
Task Id: 17    | 3.603 | Busy Threads: 17
Task Id: 18    | 4.107 | Busy Threads: 18
Task Id: 19    | 4.611 | Busy Threads: 19
Task Id: 20    | 5.113 | Busy Threads: 20
Task Id: 21    | 5.617 | Busy Threads: 21
Task Id: 22    | 6.122 | Busy Threads: 22
Task Id: 23    | 7.128 | Busy Threads: 23
Task Id: 24    | 7.632 | Busy Threads: 24
Task SetResult | 8.135 | Busy Threads: 25
Done:          | 8.136
Task.Run 會把 Task 調度到線程池上執(zhí)行,前 24 個 task 都會被阻塞住,直到第 25 個被執(zhí)行。每次都會打印出當前線程池中正在執(zhí)行任務的線程數(shù)(也就是創(chuàng)建完成的線程數(shù))。
可以觀察到以下結果:
- 前幾次循環(huán),線程隨著 Task 數(shù)量遞增,后面幾次循環(huán)直到循環(huán)結束為止,線程數(shù)一直維持在 12 沒有發(fā)生變化。
- 線程數(shù)在達到 12 之前,零間隔時間增加。第 12 到 第 13 線程間隔 1s 不到,往后約 500ms 增加一個線程。
.NET 5 實驗二 調整 ThreadPool 設置
在上面的代碼最前面加入以下兩行代碼,繼續(xù)在 .NET 5 環(huán)境運行一次。
ThreadPool.GetMinThreads(out int defaultMinThreads, out int completionPortThreads);
Console.WriteLine($"DefaultMinThreads: {defaultMinThreads}");
ThreadPool.SetMinThreads(14, completionPortThreads);
運行結果如下
DefaultMinThreads: 12
Loop Id: 01    | 0.000 | Busy Threads: 0
Loop Id: 02    | 0.003 | Busy Threads: 1
Loop Id: 03    | 0.003 | Busy Threads: 2
Loop Id: 04    | 0.003 | Busy Threads: 5
Loop Id: 05    | 0.004 | Busy Threads: 8
Task Id: 01    | 0.004 | Busy Threads: 10
Task Id: 03    | 0.004 | Busy Threads: 10
Loop Id: 06    | 0.004 | Busy Threads: 10
Task Id: 02    | 0.004 | Busy Threads: 10
Task Id: 04    | 0.004 | Busy Threads: 10
Task Id: 05    | 0.004 | Busy Threads: 12
Loop Id: 07    | 0.004 | Busy Threads: 9
Loop Id: 08    | 0.004 | Busy Threads: 10
Loop Id: 09    | 0.004 | Busy Threads: 11
Loop Id: 10    | 0.004 | Busy Threads: 12
Task Id: 08    | 0.004 | Busy Threads: 14
Task Id: 06    | 0.004 | Busy Threads: 14
Task Id: 09    | 0.004 | Busy Threads: 14
Task Id: 10    | 0.004 | Busy Threads: 14
Loop Id: 11    | 0.004 | Busy Threads: 14
Loop Id: 12    | 0.004 | Busy Threads: 14
Loop Id: 13    | 0.004 | Busy Threads: 14
Loop Id: 14    | 0.004 | Busy Threads: 14
Loop Id: 15    | 0.004 | Busy Threads: 14
Loop Id: 16    | 0.004 | Busy Threads: 14
Loop Id: 17    | 0.004 | Busy Threads: 14
Loop Id: 18    | 0.004 | Busy Threads: 14
Loop Id: 19    | 0.004 | Busy Threads: 14
Loop Id: 20    | 0.004 | Busy Threads: 14
Loop Id: 21    | 0.004 | Busy Threads: 14
Loop Id: 22    | 0.004 | Busy Threads: 14
Task Id: 11    | 0.004 | Busy Threads: 14
Loop Id: 23    | 0.004 | Busy Threads: 14
Loop Id: 24    | 0.005 | Busy Threads: 14
Task Id: 07    | 0.005 | Busy Threads: 14
Task Id: 12    | 0.005 | Busy Threads: 14
Task Id: 13    | 0.005 | Busy Threads: 14
Task Id: 14    | 0.005 | Busy Threads: 14
Task Id: 15    | 0.982 | Busy Threads: 15
Task Id: 16    | 1.486 | Busy Threads: 16
Task Id: 17    | 1.991 | Busy Threads: 17
Task Id: 18    | 2.997 | Busy Threads: 18
Task Id: 19    | 3.501 | Busy Threads: 19
Task Id: 20    | 4.004 | Busy Threads: 20
Task Id: 21    | 4.509 | Busy Threads: 21
Task Id: 22    | 5.014 | Busy Threads: 22
Task Id: 23    | 5.517 | Busy Threads: 23
Task Id: 24    | 6.021 | Busy Threads: 24
Task SetResult | 6.522 | Busy Threads: 25
Done:          | 6.523
在調整完線程池的最小線程數(shù)量之后,線程注入速度發(fā)生轉折的時間點從第 12(默認min threads) 個線程換到了第 14(修改后的min threads)個線程。
整體時間也從 8s 縮到 6s。
.NET 5 實驗三 tcs.Task.Wait() 改為 Thread.Sleep
static void Main(string[] args)
{
    var sw = Stopwatch.StartNew();
    var tasks = new List<Task>();
    for (int i = 1; i <= Environment.ProcessorCount * 2; i++)
    {
        int id = i;
        Console.WriteLine(
            $"Loop Id: {id:00}    | {sw.Elapsed.TotalSeconds:0.000} | Busy Threads: {GetBusyThreads()}");
        tasks.Add(Task.Run(() =>
        {
            Console.WriteLine(
                $"Task Id: {id:00}    | {sw.Elapsed.TotalSeconds:0.000} | Busy Threads: {GetBusyThreads()}");
            Thread.Sleep(Environment.ProcessorCount * 1000);
        }));
    }
    Task.WhenAll(tasks.ToArray()).ContinueWith(_ =>
    {
        Console.WriteLine($"Done:          | {sw.Elapsed.TotalSeconds:0.000}");
    });
    Console.ReadLine();
}
Loop Id: 01    | 0.000 | Busy Threads: 0
Loop Id: 02    | 0.027 | Busy Threads: 1
Loop Id: 03    | 0.027 | Busy Threads: 2
Loop Id: 04    | 0.027 | Busy Threads: 3
Loop Id: 05    | 0.028 | Busy Threads: 4
Loop Id: 06    | 0.028 | Busy Threads: 10
Loop Id: 07    | 0.028 | Busy Threads: 9
Loop Id: 08    | 0.028 | Busy Threads: 9
Loop Id: 09    | 0.028 | Busy Threads: 10
Loop Id: 10    | 0.028 | Busy Threads: 12
Loop Id: 11    | 0.028 | Busy Threads: 12
Loop Id: 12    | 0.028 | Busy Threads: 12
Loop Id: 13    | 0.028 | Busy Threads: 12
Loop Id: 14    | 0.028 | Busy Threads: 12
Loop Id: 15    | 0.028 | Busy Threads: 12
Loop Id: 16    | 0.028 | Busy Threads: 12
Loop Id: 17    | 0.028 | Busy Threads: 12
Loop Id: 18    | 0.028 | Busy Threads: 12
Loop Id: 19    | 0.028 | Busy Threads: 12
Loop Id: 20    | 0.028 | Busy Threads: 12
Loop Id: 21    | 0.028 | Busy Threads: 12
Loop Id: 22    | 0.028 | Busy Threads: 12
Loop Id: 23    | 0.028 | Busy Threads: 12
Loop Id: 24    | 0.028 | Busy Threads: 12
Task Id: 01    | 0.029 | Busy Threads: 12
Task Id: 05    | 0.029 | Busy Threads: 12
Task Id: 03    | 0.029 | Busy Threads: 12
Task Id: 08    | 0.029 | Busy Threads: 12
Task Id: 09    | 0.029 | Busy Threads: 12
Task Id: 10    | 0.029 | Busy Threads: 12
Task Id: 06    | 0.029 | Busy Threads: 12
Task Id: 11    | 0.029 | Busy Threads: 12
Task Id: 12    | 0.029 | Busy Threads: 12
Task Id: 04    | 0.029 | Busy Threads: 12
Task Id: 02    | 0.029 | Busy Threads: 12
Task Id: 07    | 0.029 | Busy Threads: 12
Task Id: 13    | 1.018 | Busy Threads: 13
Task Id: 14    | 1.522 | Busy Threads: 14
Task Id: 15    | 2.025 | Busy Threads: 15
Task Id: 16    | 2.530 | Busy Threads: 16
Task Id: 17    | 3.530 | Busy Threads: 17
Task Id: 18    | 4.035 | Busy Threads: 18
Task Id: 19    | 4.537 | Busy Threads: 19
Task Id: 20    | 5.040 | Busy Threads: 20
Task Id: 21    | 5.545 | Busy Threads: 21
Task Id: 22    | 6.048 | Busy Threads: 22
Task Id: 23    | 7.049 | Busy Threads: 23
Task Id: 24    | 8.056 | Busy Threads: 24
Done:          | 20.060
達到 min threads (默認12)之后,線程注入速度明顯變慢,最快間隔 500ms。
.NET 6 實驗一 默認 ThreadPool 設置
將 .NET 5 實驗一的代碼在 .NET 6 執(zhí)行一次
Loop Id: 01    | 0.001 | Busy Threads: 0
Loop Id: 02    | 0.018 | Busy Threads: 1
Loop Id: 03    | 0.018 | Busy Threads: 3
Loop Id: 04    | 0.018 | Busy Threads: 6
Loop Id: 05    | 0.018 | Busy Threads: 4
Loop Id: 06    | 0.018 | Busy Threads: 5
Loop Id: 07    | 0.018 | Busy Threads: 6
Loop Id: 08    | 0.018 | Busy Threads: 8
Task Id: 01    | 0.018 | Busy Threads: 11
Task Id: 04    | 0.018 | Busy Threads: 11
Task Id: 03    | 0.018 | Busy Threads: 11
Task Id: 02    | 0.018 | Busy Threads: 11
Task Id: 05    | 0.018 | Busy Threads: 11
Loop Id: 09    | 0.018 | Busy Threads: 12
Loop Id: 10    | 0.018 | Busy Threads: 12
Loop Id: 11    | 0.018 | Busy Threads: 12
Loop Id: 12    | 0.018 | Busy Threads: 12
Loop Id: 13    | 0.018 | Busy Threads: 12
Task Id: 09    | 0.018 | Busy Threads: 12
Loop Id: 14    | 0.018 | Busy Threads: 12
Loop Id: 15    | 0.018 | Busy Threads: 12
Loop Id: 16    | 0.018 | Busy Threads: 12
Loop Id: 17    | 0.018 | Busy Threads: 12
Task Id: 06    | 0.018 | Busy Threads: 12
Loop Id: 18    | 0.018 | Busy Threads: 12
Loop Id: 19    | 0.018 | Busy Threads: 12
Loop Id: 20    | 0.018 | Busy Threads: 12
Loop Id: 21    | 0.018 | Busy Threads: 12
Loop Id: 22    | 0.018 | Busy Threads: 12
Loop Id: 23    | 0.018 | Busy Threads: 12
Loop Id: 24    | 0.018 | Busy Threads: 12
Task Id: 10    | 0.018 | Busy Threads: 12
Task Id: 07    | 0.019 | Busy Threads: 12
Task Id: 11    | 0.019 | Busy Threads: 12
Task Id: 08    | 0.019 | Busy Threads: 12
Task Id: 12    | 0.019 | Busy Threads: 12
Task Id: 13    | 0.020 | Busy Threads: 16
Task Id: 14    | 0.020 | Busy Threads: 17
Task Id: 15    | 0.020 | Busy Threads: 18
Task Id: 16    | 0.020 | Busy Threads: 19
Task Id: 17    | 0.020 | Busy Threads: 20
Task Id: 18    | 0.020 | Busy Threads: 21
Task Id: 19    | 0.020 | Busy Threads: 22
Task Id: 20    | 0.020 | Busy Threads: 23
Task Id: 21    | 0.020 | Busy Threads: 24
Task Id: 23    | 0.020 | Busy Threads: 24
Task Id: 22    | 0.020 | Busy Threads: 24
Task Id: 24    | 0.020 | Busy Threads: 24
Task SetResult | 0.045 | Busy Threads: 25
Done:          | 0.046
與實驗一相比,雖然線程數(shù)仍然停留在 12 了一段時間,但隨后線程就立即增長了,后文會介紹 .NET 6 在這方面做出的改進。
.NET 6 實驗二 調整 ThreadPool 設置
將 .NET 5 實驗二的代碼在 .NET 6 中執(zhí)行一次
DefaultMinThreads: 12
Loop Id: 01    | 0.001 | Busy Threads: 0
Loop Id: 02    | 0.014 | Busy Threads: 1
Loop Id: 03    | 0.014 | Busy Threads: 2
Loop Id: 04    | 0.015 | Busy Threads: 5
Loop Id: 05    | 0.015 | Busy Threads: 4
Loop Id: 06    | 0.015 | Busy Threads: 5
Loop Id: 07    | 0.015 | Busy Threads: 7
Loop Id: 08    | 0.015 | Busy Threads: 8
Loop Id: 09    | 0.015 | Busy Threads: 11
Task Id: 06    | 0.015 | Busy Threads: 9
Task Id: 01    | 0.015 | Busy Threads: 9
Task Id: 02    | 0.015 | Busy Threads: 9
Task Id: 05    | 0.015 | Busy Threads: 9
Task Id: 03    | 0.015 | Busy Threads: 9
Task Id: 04    | 0.015 | Busy Threads: 9
Task Id: 07    | 0.015 | Busy Threads: 9
Task Id: 08    | 0.016 | Busy Threads: 9
Task Id: 09    | 0.016 | Busy Threads: 9
Loop Id: 10    | 0.016 | Busy Threads: 9
Loop Id: 11    | 0.016 | Busy Threads: 10
Loop Id: 12    | 0.016 | Busy Threads: 11
Loop Id: 13    | 0.016 | Busy Threads: 13
Task Id: 10    | 0.016 | Busy Threads: 14
Loop Id: 14    | 0.016 | Busy Threads: 14
Loop Id: 15    | 0.016 | Busy Threads: 14
Loop Id: 16    | 0.016 | Busy Threads: 14
Task Id: 11    | 0.016 | Busy Threads: 14
Loop Id: 17    | 0.016 | Busy Threads: 14
Loop Id: 18    | 0.016 | Busy Threads: 14
Loop Id: 19    | 0.016 | Busy Threads: 14
Loop Id: 20    | 0.016 | Busy Threads: 14
Loop Id: 21    | 0.016 | Busy Threads: 14
Loop Id: 22    | 0.016 | Busy Threads: 14
Loop Id: 23    | 0.016 | Busy Threads: 14
Loop Id: 24    | 0.016 | Busy Threads: 14
Task Id: 12    | 0.016 | Busy Threads: 14
Task Id: 13    | 0.016 | Busy Threads: 14
Task Id: 14    | 0.016 | Busy Threads: 14
Task Id: 15    | 0.017 | Busy Threads: 18
Task Id: 16    | 0.017 | Busy Threads: 19
Task Id: 17    | 0.017 | Busy Threads: 20
Task Id: 18    | 0.017 | Busy Threads: 21
Task Id: 19    | 0.017 | Busy Threads: 22
Task Id: 20    | 0.018 | Busy Threads: 23
Task Id: 21    | 0.018 | Busy Threads: 24
Task Id: 22    | 0.018 | Busy Threads: 25
Task Id: 23    | 0.018 | Busy Threads: 26
Task Id: 24    | 0.018 | Busy Threads: 26
Task SetResult | 0.018 | Busy Threads: 25
Done:          | 0.019
前半部分有部分日志亂序,可以看到,與實驗三一樣,維持在最大線程數(shù)一小段時間之后,立即就開始了線程增長。
.NET 6 實驗三 tcs.Task.Wait() 改為 Thread.Sleep
將 .NET 5 實驗三的代碼在 .NET 6 中執(zhí)行一次
Loop Id: 01    | 0.003 | Busy Threads: 0
Loop Id: 02    | 0.024 | Busy Threads: 1
Loop Id: 03    | 0.025 | Busy Threads: 2
Loop Id: 04    | 0.025 | Busy Threads: 3
Loop Id: 05    | 0.025 | Busy Threads: 7
Loop Id: 06    | 0.025 | Busy Threads: 5
Loop Id: 07    | 0.025 | Busy Threads: 6
Loop Id: 08    | 0.025 | Busy Threads: 7
Loop Id: 09    | 0.025 | Busy Threads: 9
Loop Id: 10    | 0.025 | Busy Threads: 10
Loop Id: 11    | 0.026 | Busy Threads: 10
Loop Id: 12    | 0.026 | Busy Threads: 11
Loop Id: 13    | 0.026 | Busy Threads: 12
Loop Id: 14    | 0.026 | Busy Threads: 12
Loop Id: 15    | 0.026 | Busy Threads: 12
Loop Id: 16    | 0.026 | Busy Threads: 12
Loop Id: 17    | 0.026 | Busy Threads: 12
Loop Id: 18    | 0.026 | Busy Threads: 12
Loop Id: 19    | 0.026 | Busy Threads: 12
Loop Id: 20    | 0.026 | Busy Threads: 12
Loop Id: 21    | 0.026 | Busy Threads: 12
Loop Id: 22    | 0.026 | Busy Threads: 12
Loop Id: 23    | 0.026 | Busy Threads: 12
Loop Id: 24    | 0.026 | Busy Threads: 12
Task Id: 01    | 0.026 | Busy Threads: 12
Task Id: 02    | 0.026 | Busy Threads: 12
Task Id: 05    | 0.026 | Busy Threads: 12
Task Id: 04    | 0.026 | Busy Threads: 12
Task Id: 06    | 0.026 | Busy Threads: 12
Task Id: 08    | 0.026 | Busy Threads: 12
Task Id: 09    | 0.026 | Busy Threads: 12
Task Id: 03    | 0.026 | Busy Threads: 12
Task Id: 11    | 0.026 | Busy Threads: 12
Task Id: 10    | 0.026 | Busy Threads: 12
Task Id: 07    | 0.026 | Busy Threads: 12
Task Id: 12    | 0.026 | Busy Threads: 12
Task Id: 13    | 1.026 | Busy Threads: 13
Task Id: 14    | 2.027 | Busy Threads: 14
Task Id: 15    | 3.028 | Busy Threads: 15
Task Id: 16    | 4.030 | Busy Threads: 16
Task Id: 17    | 5.031 | Busy Threads: 17
Task Id: 18    | 6.032 | Busy Threads: 18
Task Id: 19    | 6.533 | Busy Threads: 19
Task Id: 20    | 7.035 | Busy Threads: 20
Task Id: 21    | 8.036 | Busy Threads: 21
Task Id: 22    | 8.537 | Busy Threads: 22
Task Id: 23    | 9.538 | Busy Threads: 23
Task Id: 24    | 10.039 | Busy Threads: 24
Done:          | 22.041
結果與 .NET 5 的實驗三相差不大。
線程注入
對照上述的幾組實驗結果,接下來以 .NET 6 中 C# 實現(xiàn)的 ThreadPool 作為資料來理解一下線程注入的幾個階段(按個人理解進行的劃分,僅供參考)。
1. 第一個線程的出現(xiàn)
隨著任務被調度到隊列上,第一個線程被創(chuàng)建出來。

下面是線程池在執(zhí)行第一個任務的時候的代碼摘要,涉及到計數(shù)的并執(zhí)行相關處理的地方,代碼都使用了 while(xxx) + Interlocked 的方式來進行并發(fā)控制,可以理解成樂觀鎖。這一階段,實際上我們只需要關注到 ThreadPoolWorkQueue.EnsureThreadRequested 方法就行了。
可利用 Rider 的反編譯 Debug 功能幫助我們學習。
下面是第一個 Task.Run 的代碼執(zhí)行路徑
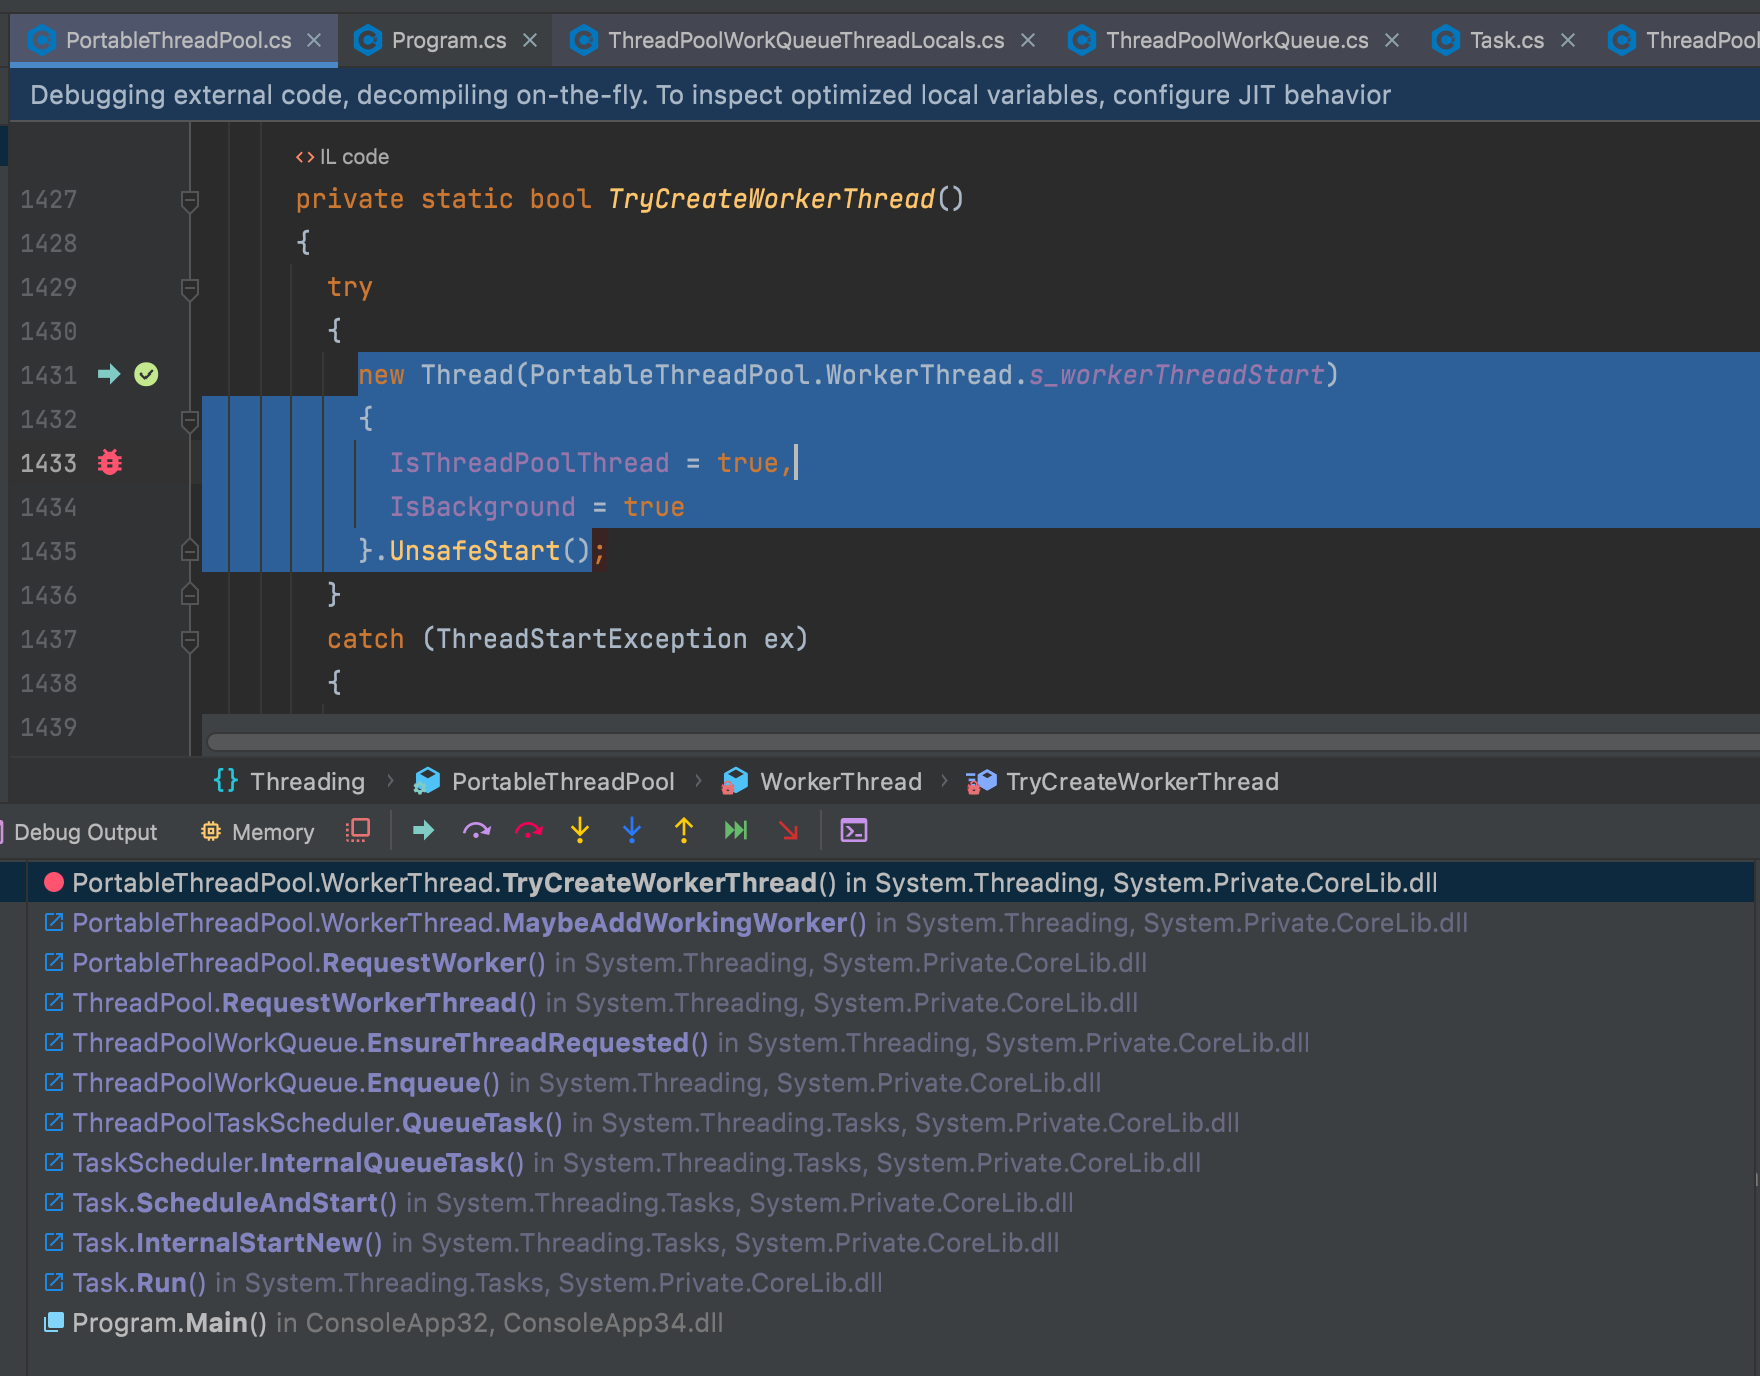
注意:執(zhí)行環(huán)節(jié)是 Main Thread
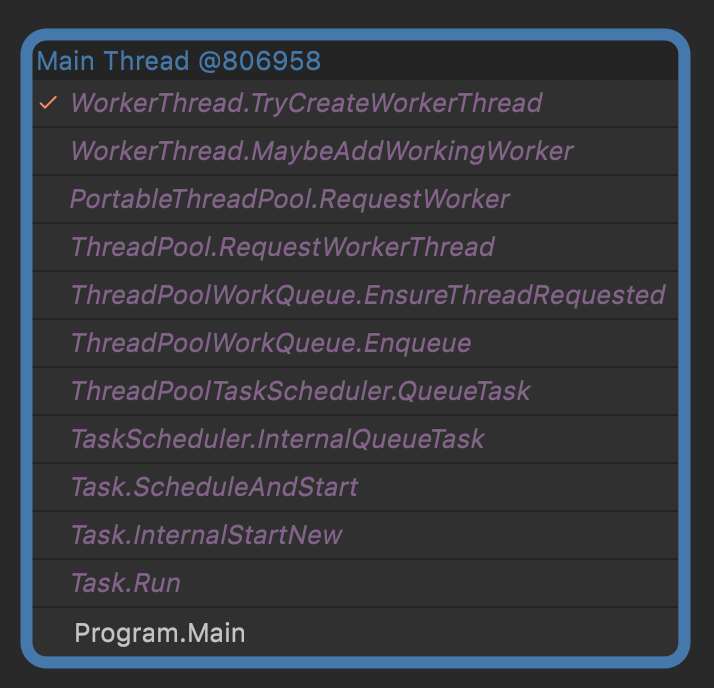
public static class ThreadPool
{
internal static readonly ThreadPoolWorkQueue s_workQueue = new ThreadPoolWorkQueue();
public static bool QueueUserWorkItem(WaitCallback callBack, object state)
{
object tpcallBack = new QueueUserWorkItemCallback(callBack!, state);
s_workQueue.Enqueue(tpcallBack, forceGlobal: true);
return true;
}
}
internal sealed class ThreadPoolWorkQueue
{
[StructLayout(LayoutKind.Sequential)]
private struct CacheLineSeparated
{
private readonly Internal.PaddingFor32 pad1;
public volatile int numOutstandingThreadRequests;
private readonly Internal.PaddingFor32 pad2;
}
private CacheLineSeparated _separated;
public void Enqueue(object callback, bool forceGlobal)
{
// 線程池中執(zhí)行的任務有兩種:IThreadPoolWorkItem、Task
Debug.Assert((callback is IThreadPoolWorkItem) ^ (callback is Task));
if (loggingEnabled && FrameworkEventSource.Log.IsEnabled())
FrameworkEventSource.Log.ThreadPoolEnqueueWorkObject(callback);
ThreadPoolWorkQueueThreadLocals? tl = null;
if (!forceGlobal)
// 獲取本地隊列,如果執(zhí)行改代碼的線程不是線程池線程,
// 那這邊是獲取不到的,就算 forceGlobal 是 false,
// 也會把任務放到全局隊列
tl = ThreadPoolWorkQueueThreadLocals.threadLocals;
if (null != tl)
{
// 放到本地隊列
tl.workStealingQueue.LocalPush(callback);
}
else
{
// 當?shù)廊株犃?
workItems.Enqueue(callback);
}
EnsureThreadRequested();
}
internal void EnsureThreadRequested()
{
//
// If we have not yet requested #procs threads, then request a new thread.
//
// CoreCLR: Note that there is a separate count in the VM which has already been incremented
// by the VM by the time we reach this point.
//
int count = _separated.numOutstandingThreadRequests;
while (count < Environment.ProcessorCount)
{
int prev = Interlocked.CompareExchange(ref _separated.numOutstandingThreadRequests, count + 1, count);
if (prev == count)
{
ThreadPool.RequestWorkerThread();
break;
}
count = prev;
}
}
public static class ThreadPool
{
/// <summary>
/// This method is called to request a new thread pool worker to handle pending work.
/// </summary>
internal static void RequestWorkerThread() => PortableThreadPool.ThreadPoolInstance.RequestWorker();
}
internal sealed class PortableThreadPool
{
public static readonly PortableThreadPool ThreadPoolInstance = new PortableThreadPool();
internal void RequestWorker()
{
// The order of operations here is important. MaybeAddWorkingWorker() and EnsureRunning() use speculative checks to
// do their work and the memory barrier from the interlocked operation is necessary in this case for correctness.
Interlocked.Increment(ref _separated.numRequestedWorkers);
WorkerThread.MaybeAddWorkingWorker(this);
// 初始化 GateThread
GateThread.EnsureRunning(this);
}
/// <summary>
/// The worker thread infastructure for the CLR thread pool.
/// </summary>
private static class WorkerThread
{
internal static void MaybeAddWorkingWorker(PortableThreadPool threadPoolInstance)
{
ThreadCounts counts = threadPoolInstance._separated.counts;
short numExistingThreads, numProcessingWork, newNumExistingThreads, newNumProcessingWork;
// 這個 while (true) 是確保計算出正確的待創(chuàng)建線程數(shù)
while (true)
{
numProcessingWork = counts.NumProcessingWork;
if (numProcessingWork >= counts.NumThreadsGoal)
{
return;
}
newNumProcessingWork = (short)(numProcessingWork + 1);
numExistingThreads = counts.NumExistingThreads;
newNumExistingThreads = Math.Max(numExistingThreads, newNumProcessingWork);
ThreadCounts newCounts = counts;
newCounts.NumProcessingWork = newNumProcessingWork;
newCounts.NumExistingThreads = newNumExistingThreads;
ThreadCounts oldCounts = threadPoolInstance._separated.counts.InterlockedCompareExchange(newCounts, counts);
if (oldCounts == counts)
{
break;
}
counts = oldCounts;
}
int toCreate = newNumExistingThreads - numExistingThreads;
int toRelease = newNumProcessingWork - numProcessingWork;
if (toRelease > 0)
{
s_semaphore.Release(toRelease);
}
while (toCreate > 0)
{
if (TryCreateWorkerThread())
{
toCreate--;
continue;
}
counts = threadPoolInstance._separated.counts;
while (true)
{
ThreadCounts newCounts = counts;
newCounts.SubtractNumProcessingWork((short)toCreate);
newCounts.SubtractNumExistingThreads((short)toCreate);
ThreadCounts oldCounts = threadPoolInstance._separated.counts.InterlockedCompareExchange(newCounts, counts);
if (oldCounts == counts)
{
break;
}
counts = oldCounts;
}
break;
}
}
private static bool TryCreateWorkerThread()
{
try
{
// Thread pool threads must start in the default execution context without transferring the context, so
// using UnsafeStart() instead of Start()
Thread workerThread = new Thread(s_workerThreadStart);
workerThread.IsThreadPoolThread = true;
workerThread.IsBackground = true;
// thread name will be set in thread proc
workerThread.UnsafeStart();
}
catch (ThreadStartException)
{
return false;
}
catch (OutOfMemoryException)
{
return false;
}
return true;
}
}
}
}
2. 達到 線程數(shù)量目標(NumThreadsGoal) 之前的線程數(shù)增長
細心的朋友會發(fā)現(xiàn)上面代碼里 EnsureThreadRequested 方法有一個終止條件,_separated.numOutstandingThreadRequests == Environment.ProcessorCount,每次新增一個 ThreadRequested,這個數(shù)就會 +1,似乎允許創(chuàng)建的最大 Worker Thread 是 Environment.ProcessorCount?
其實 ThreadPoolWorkQueue 維護的 NumOutstandingThreadRequests 這個值會在線程池線程真正跑起來之后,會在 ThreadPoolWorkQueue.Dispatch方法中 -1。也就是說,只要有一個線程真正運行起來了,就能創(chuàng)建第 Environment.ProcessorCount + 1 個Thread。當然,在向 ThreadPoolWorkQueue 加入第13個任務的時候,第13個 Worker Thread 就算不允許創(chuàng)建也沒關系,因為任務已經(jīng)入隊了,會被運行起來的 Worker Thread 取走。
PortableThreadPool里維護了一個計數(shù)器 PortableThreadPool.ThreadPoolInstance._separated.counts,記錄了 Worker Thread 相關的三個數(shù)值:
- NumProcessingWork:當前正在執(zhí)行任務的 Worker Thread。
- NumExistingThreads:當前線程池中實際有的 Worker Thread。
- NumThreadsGoal:當前允許創(chuàng)建的最大 Worker Thread,初始值為 min threads,最大值受限于 max threads。
min threads 初始值:運行環(huán)境 CPU 核心數(shù),可通過 ThreadPool.SetMinThreads 進行設置,參數(shù)有效范圍是 [1, max threads]。
max threads 初始值:32位平臺 1023,64位平臺 short.MaxValue,可通過 ThreadPool.SetMaxThreads 進行設置。
核心的變量就是這個 NumThreadsGoal 了,它會在下面幾種情況中被更新,后文會補充說明:
- 更新 ThreadPool 的 min threads 或 max threads 時可能會更新 NumThreadsGoal。
- 避免饑餓機制(Starvation Avoidance)里的 GateThread 會更新 NumThreadsGoal。
- 有 Worker Thread 被同步代碼阻塞時 NumThreadsGoal 可能會被更新以避免 Worker Thread 不夠用,這是.NET6開始新增的邏輯。
- 爬山算法根據(jù) ThreadPool 吞吐量態(tài)更新 NumThreadsGoal。
    internal class PortableThreadPool
    {
        public static readonly PortableThreadPool ThreadPoolInstance = new PortableThreadPool();
        private CacheLineSeparated _separated;
        private struct CacheLineSeparated
        {
            public ThreadCounts counts;
        }
        /// <summary>
        /// Tracks information on the number of threads we want/have in different states in our thread pool.
        /// </summary>
        private struct ThreadCounts
        {
            /// <summary>
            /// Number of threads processing work items.
            /// </summary>
            public short NumProcessingWork { get; set; }
            /// <summary>
            /// Number of thread pool threads that currently exist.
            /// </summary>
            public short NumExistingThreads { get; set; }
            // <summary>
            /// Max possible thread pool threads we want to have.
            /// </summary>
            public short NumThreadsGoal { get; set; }
        }
    }

3. 避免饑餓機制(Starvation Avoidance)
上面講到,隨著任務進入隊列系統(tǒng),Worker Thread 將隨之增長,直到達到 NumThreadsGoal。
NumThreadsGoal 是12,前 12 個線程都被堵住了,加入到隊列系統(tǒng)的第 13 個任務沒辦法被這前 12 個線程領走執(zhí)行。
在這種情況下,線程池的 Starvation Avoidance 機制就起到作用了。
在上述所說的第一個階段,除了線程池中的第一個線程會被創(chuàng)建之外,GateThread 也會隨之被初始化。在第一階段的代碼摘錄中,可以看到 GateThread 的初始化。
internal sealed class PortableThreadPool
{
    public static readonly PortableThreadPool ThreadPoolInstance = new PortableThreadPool();
    internal void RequestWorker()
    {
        Interlocked.Increment(ref _separated.numRequestedWorkers);
        WorkerThread.MaybeAddWorkingWorker(this);
        // 初始化 GateThread
        GateThread.EnsureRunning(this);
    }
}
在 GateThread 是一個獨立的線程,每隔 500ms 進行檢查一下,如果 NumProcessingWork >= NumThreadsGoal(WorkerThread.MaybeAddWorkingWorker 不添加 Worker Thread 的判斷條件),就設置新的 NumThreadsGoal = NumProcessingWork + 1,并調用 WorkerThread.MaybeAddWorkingWorker,這樣新的 Worker Thread 就可以被 WorkerThread.MaybeAddWorkingWorker 創(chuàng)建。
這就解釋了,為什么 .NET 5 實驗一、二在線程數(shù)達到min threads(NumThreadsGoal 的默認值)之后,后面 Worker Thread 的增長是每 500ms 一個。
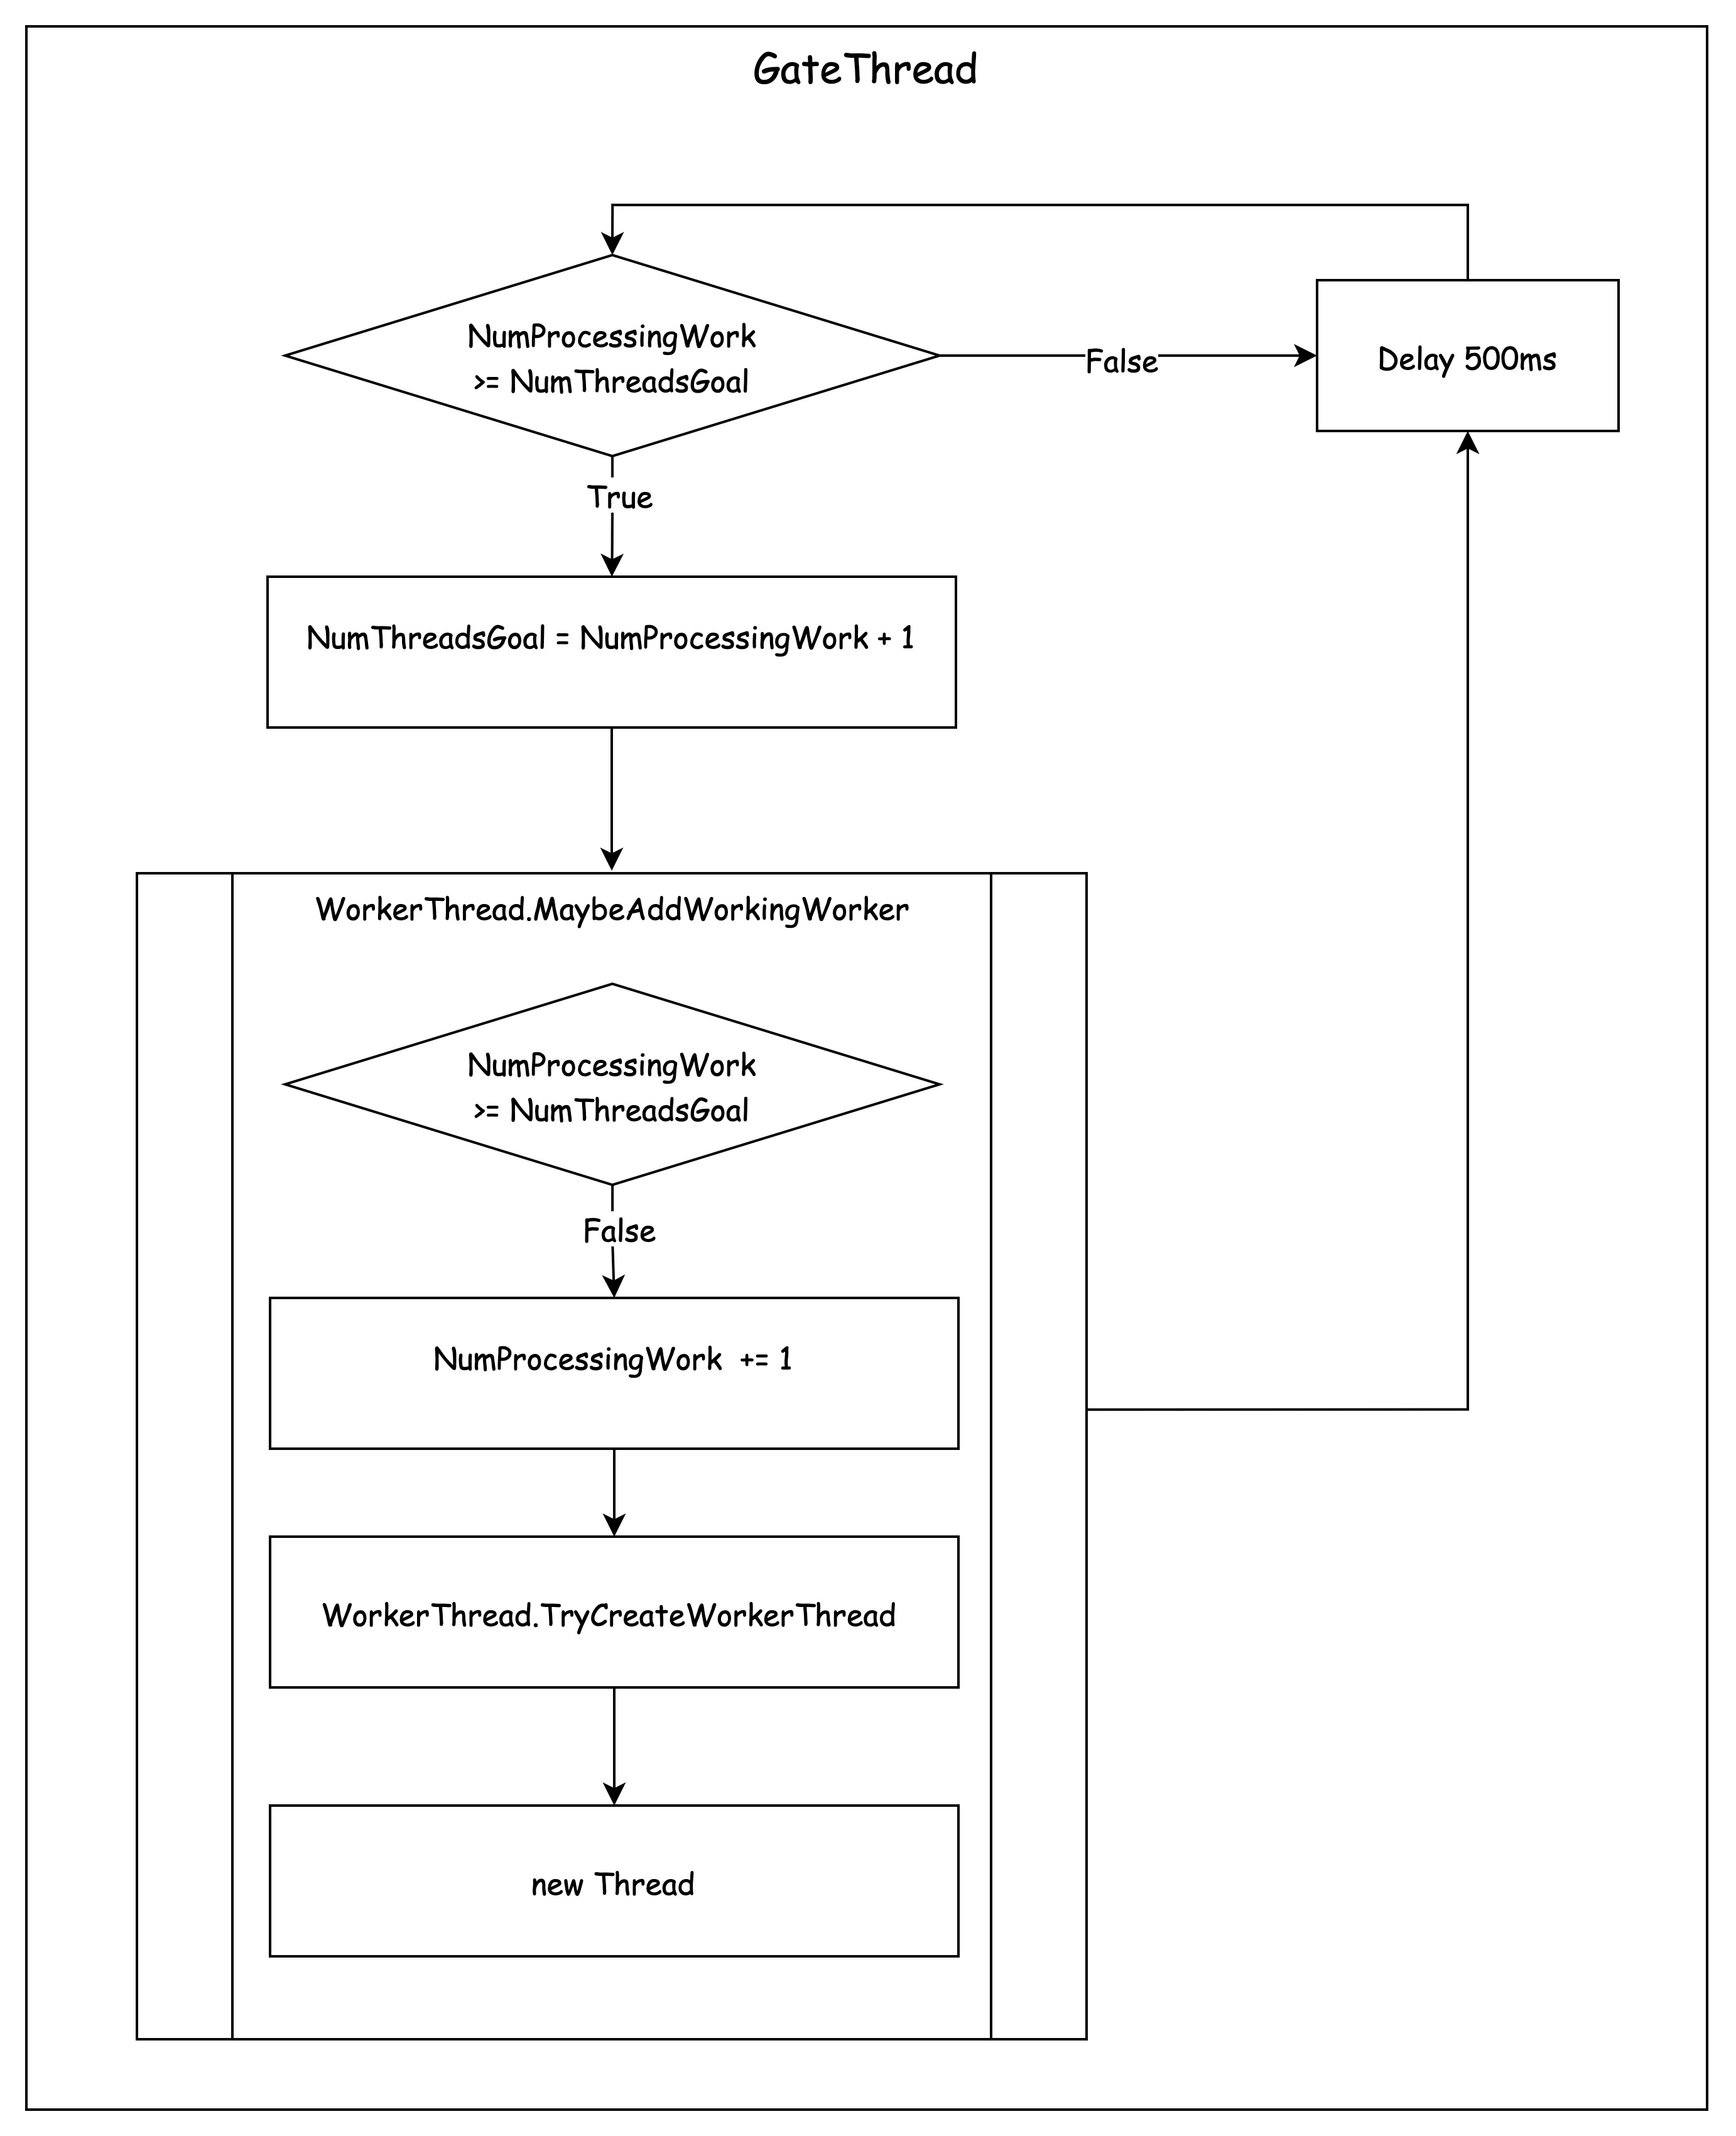
由于在第三階段中,線程的增長會比較緩慢,有經(jīng)驗的開發(fā)會在應用啟動的時候設置一個較大的 min threads,使其較晚或不進入第三階段。
線程注入在 .NET 6 中的改進
.NET 6 與 .NET 5 的實驗二相比,達到 min threads 之后,線程的增長速度有明顯的差異,而兩者的實驗三卻相差不大。
.NET 6 對于 Task.Wait 導致線程池線程阻塞的場景進行了優(yōu)化,但如果并非此原因導致的線程數(shù)不夠用,依舊是 Starvation Avoidance 的策略。
新的 ThreadPool 提供了一個 ThreadPool.NotifyThreadBlocked 的內部接口,里面會調用 GateThread.Wake 去喚醒 GateThread 本來 500ms 執(zhí)行一次的邏輯,這 500ms 的間隔時間是通過 AutoResetEvent 實現(xiàn)的,所以 GateThread.Wake 也很簡單。
關鍵代碼示意,非真實代碼:
internal class PortableThreadPool
{
    public bool NotifyThreadBlocked()
    {
        // ...
        GateThread.Wake(this);
        return true;
    }
    private static class GateThread
    {
        private static readonly AutoResetEvent DelayEvent = new AutoResetEvent(initialState: false);
        // GateThread 入口方法
        private static void GateThreadStart()
        {
            while(true)
            {
                DelayEvent.WaitOne(500);
                // ...
            }
        }
        public static void Wake(PortableThreadPool threadPoolInstance)
        {
            DelayEvent.Set();
            EnsureRunning(threadPoolInstance);
        }
    }

爬山算法(Hill Climbing)
除了上述介紹的線程注入機制外,從CLR 4.0開始,線程池內實現(xiàn)了一個根據(jù)采集到線程池吞吐率數(shù)據(jù)(每次任務完成時記錄數(shù)據(jù)),推導出該算法認為最優(yōu)的線程池線程數(shù)量。
算法實現(xiàn)位于 HillClimbing.ThreadPoolHillClimber.Update,有興趣的朋友可以去看一下。
public (int newThreadCount, int newSampleMs) Update(int currentThreadCount, double sampleDurationSeconds, int numCompletions)
currentThreadCount:當前線程數(shù)
sampleDurationSeconds:采樣間隔
numCompletions:這段采樣時間間隔內完成的任務數(shù)
newThreadCount:新的線程數(shù)
newSample:新的采樣間隔時間
不必要線程的銷毀
如果線程需要被移除的時候,本地隊列還存在待執(zhí)行任務,則會將這些任務轉移到全局隊列中。
在以下幾個場景中,線程池將會銷毀掉不需要的線程,并不一定全面,只限于筆者當前認知。
- 在無法從隊列系統(tǒng)領取到任務時。
- 通過爬山算法認定當前線程屬于多余線程時。
小結
Worker Thread 的數(shù)量會隨著進入 ThreadPool 的任務數(shù)量增加,直至 Worker Thread 的數(shù)量達到 NumThreadsGoal。
NumThreadsGoal 可能會在下述情況中更新:
- 更新 ThreadPool 的 min threads 或 max threads 時。
- 避免饑餓機制(Starvation Avoidance)。
- 有 Worker Thread 被同步代碼阻塞時。
- 爬山算法的動態(tài)更新。
Worker Thread 無任務可執(zhí)行及被爬山算法判定為多余時會被銷毀。
總結
交給線程池去執(zhí)行的任務會進入線程池的隊列系統(tǒng)最終交給 Worker Thread 去執(zhí)行。
線程池會根據(jù)線程池中任務的執(zhí)行情況去動態(tài)的調整 Worker Thread 的創(chuàng)建與銷毀。
轉自https://www.cnblogs.com/eventhorizon/p/15316955.html
該文章在 2025/8/8 10:07:54 編輯過
的專業(yè)生產(chǎn)管理軟件系統(tǒng),系統(tǒng)成熟度和易用性得到了國內大量中小企業(yè)的青睞。")
主要針對港口碼頭集裝箱與散貨日常運作、調度、堆場、車隊、財務費用、相關報表等業(yè)務管理,結合碼頭的業(yè)務特點,圍繞調度、堆場作業(yè)而開發(fā)的。集技術的先進性、管理的有效性于一體,是物流碼頭及其他港口類企業(yè)的高效ERP管理信息系統(tǒng)。")
提供了貨物產(chǎn)品管理,銷售管理,采購管理,倉儲管理,倉庫管理,保質期管理,貨位管理,庫位管理,生產(chǎn)管理,WMS管理系統(tǒng),標簽打印,條形碼,二維碼管理,批號管理軟件。")
同辦公管理系統(tǒng)。")


 400 186 1886
")